提起短视频,应该没有人不知道吧。现在基本上到处都能看得见有人拿着手机在刷短视频。我也玩过短视频,当我在玩短视频时,也尝试了应用里面的一些特效和道具,感觉很有趣。于是我就想着能不能自己尝试着做出这些效果呢?这些特效很多都和图像处理相关,例如人脸检测、人脸关键点检测,语义分割等等。如果是自己去训练模型来实现这些特效感觉会很麻烦,幸好遇见了 PaddleHub,可以直接使用一些训练好的模型,因此实现这些特效变得简单得多。
接下来,本篇文章将介绍如何使用 PaddleHub 来实现以下效果:
PaddleHub 介绍 PaddleHub 便捷地获取 PaddlePaddle 生态下的预训练模型,完成模型的管理和一键预测。配合使用 Fine-tune API,可以基于大规模预训练模型快速完成迁移学习,让预训练模型能更好地服务于用户特定场景的应用。
PaddleHub 有许多学习模型,包括文本、图像和视频。想要了解更多关于 PaddleHub 的内容请访问 PaddleHub 官方网站 。
Part1. 变换人体部分的颜色
注:由于现在人体解析模型的接口已经更新到 1.1.0 版本,接口发生了变化,该代码仅支持 1.0.0 版本,需要使用下面安装代码进行安装
$ hub install ace2p==1.0.0
在 PaddleHub 学习模型中,有一个人体解析的模型,ace2p。人体解析是细粒度的语义分割任务,其旨在识别像素级别的人类图像的组成部分(例如,身体部位和服装)。该模型将人体分为 20 个部分,包括头、头发、左手、右手、上衣、裤子等等。更多的内容可以参考官方模型介绍 。
这里我只实现了头发和上衣颜色的改变,其他部分原理相同。接下来开始具体实现代码的介绍:
首先,导入相关库,由于需要使用到 PaddleHub 中的模型,首先需要导入 paddlehub 库,同时为了更方便地进行图像处理,我这里使用了 opencv 库。
import paddlehub as hubimport cv2
然后如 ace2p 官方模型 中介绍的那样调用 PaddleHub 检测出给定图像的人体部分,这里我使用的给定图像如下所示,该图像只有人体的上半身,我这里想要处理的人体部位是头发和上衣。
img_src = ['origin.jpg' ] ace2p = hub.Module(name="ace2p" ) input_dict = {"image" : img_src} results = ace2p.segmentation(data=input_dict) for result in results: print (result['origin' ]) print (result['processed' ])
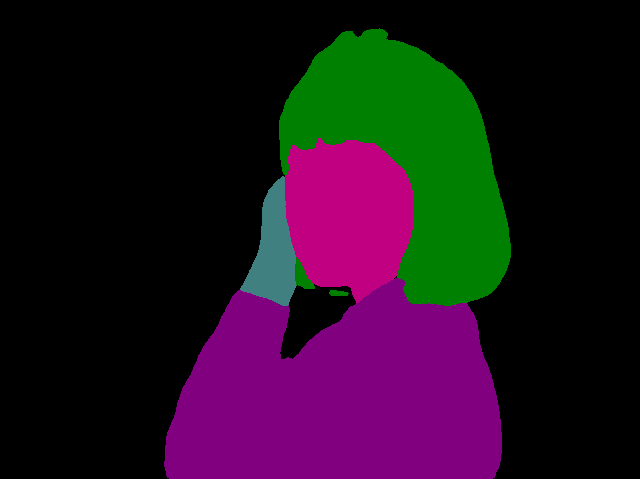
因为该接口可以一次处理多张图像,所以输入是列表的形式。PaddleHub 处理后的图像会保存在 ace2p_output 文件夹中,给定图像的人体分析效果如下:
在这张结果图中可以看到不同的人体部分经过语义分割后用不同的颜色进行标记,这些颜色值是官方定义的,具体的数值可以参见官方文档 。然后根据官方指定的人体部分颜色定义一个颜色字典
colors = { 'background' : '#000000' , 'hat' : '#800000' , 'hair' : '#008000' , 'glove' : '#808000' , 'sunglasses' : '#000080' , 'upperclothes' : '#800080' , 'dress' : '#008080' , 'coat' : '#808080' , 'socks' : '#400000' , 'pants' : '#c00000' , 'jumpsuits' : '#408000' , 'scarf' : '#c08000' , 'skirt' : '#400080' , 'face' : '#c00080' , 'left-arm' : '#408080' , 'right-arm' : '#c08080' , 'left-leg' : '#004000' , 'right-leg' : '#804000' , 'left-shoe' : '#00c000' , 'right-shoe' : '#80c000' , }
在上面指定的颜色中,颜色均为字符串,但是实际在使用 opencv 改变颜色时,我们使用的是 cv2 的颜色格式,python 中 opencv 颜色的格式是一个三元组,例如 (255, 255, 255),因此需要定义一个颜色格式转换的方法,该方法将三个两位 16 进制的字符串转换为 [0, 255] 之间的一个整数。
def color_str_to_list (color_str ): return [int (color_str[1 :3 ], 16 ), int (color_str[3 :5 ], 16 ), int (color_str[5 :7 ], 16 )]
在 color_str_to_list 函数中,返回的是一个列表(也可以使用元组),列表中包含三个元素,每一个元素使用 int() 函数将 16 进制的字符串转换为整数,最终得到就是 opencv 中想要的颜色值。
然后是变换颜色的方法,该方法输入原始图像和 PaddleHub 进行人体分析后的结果图像,同时指定需要变换颜色的人体部分,以及要改变后的颜色,返回改变颜色后的图像
def change_color (origin_img, mask_img, label, color=None ): label_mask = mask_img.copy() result = origin_img.copy() alpha = 0.8 label_mask[np.where((label_mask != color_str_to_list(colors[label])).any (axis=2 ))] = [0 , 0 , 0 ] if not color: color = color_str_to_list(colors[label]) pos = np.where((label_mask == color_str_to_list(colors[label])).all (axis=2 )) for i, j in zip (pos[0 ], pos[1 ]): result[i][j] = alpha * origin_img[i][j] + (1 - alpha) * np.array(color) return result
在 change_color 函数中,首先将原始图像和语义分割得到的人体分析结果图进行拷贝。该函数一次只处理人体中的某一个部分,例如头发,所以接着将不是头发的其他人体部分变为背景,得到只含有某个人体部分的分割图。这个分割图中的人体部分是使用的官方指定的颜色,我们想要改变该颜色,所以最后回去那些想要被改变颜色的人体部分的位置坐标,然后将这部分区域的原始图像和想要改变的颜色进行融合。可以通过改变代码中的 alpha 值使得融合后看起来更佳自然。
为了展示效果,这里再定义一个随机颜色生成方法
def get_random_color (): return (randrange(0 , 255 , 1 ), randrange(0 , 255 , 1 ), randrange(0 , 255 , 1 ))
在 AIStudio 中不能像在本地一样使用 cv2 对图像进行连续展示,因此在 AIStudio 中使用 matplotlib 的 animation 进行动图展示。在以下代码中,对每一帧改变上衣和头发的颜色。
def seg_main (): img_res = cv2.imread('humanseg_output/origin.png' , -1 ) origin = cv2.imread('origin.jpg' , cv2.IMREAD_UNCHANGED) mask = cv2.imread('ace2p_output/origin_processed.png' , cv2.IMREAD_UNCHANGED) final_list = [] fig = plt.figure() for i in range (50 ): final = change_color(origin, mask, 'upperclothes' , get_random_color()) final = change_color(final, mask, 'hair' , get_random_color()) final = cv2.cvtColor(final, cv2.COLOR_BGRA2RGBA) im = plt.imshow(final, animated=True ) plt.axis('off' ) final_list.append([im]) return final_list, fig
在 seg_main 函数中,首先读入原始图像和人体分析后的结果图像,由于处理后的图像是 4 通道的,所以读取的时候需要为 imread 添加参数 cv2.IMREAD_UNCHANGED。这里想要处理 50 次图像,每次处理时颜色随机生成,然后将每次处理后的图像通过视频进行展示,所以使用了循环。每次循环需要调用两次 change_color 函数,分别改变头发和上衣的颜色。最后通过下面的代码将每一帧图像生成视频并保存。
from IPython.display import HTMLimport numpy as npimport matplotlib.animation as animationims, fig = seg_main() ani = animation.ArtistAnimation(fig, ims, interval=500 , blit=True , repeat_delay=1000 ) ani.save("movie.mp4" ) HTML(ani.to_html5_video())
最终效果如下动图,可以看出颜色改变得还是挺自然的。
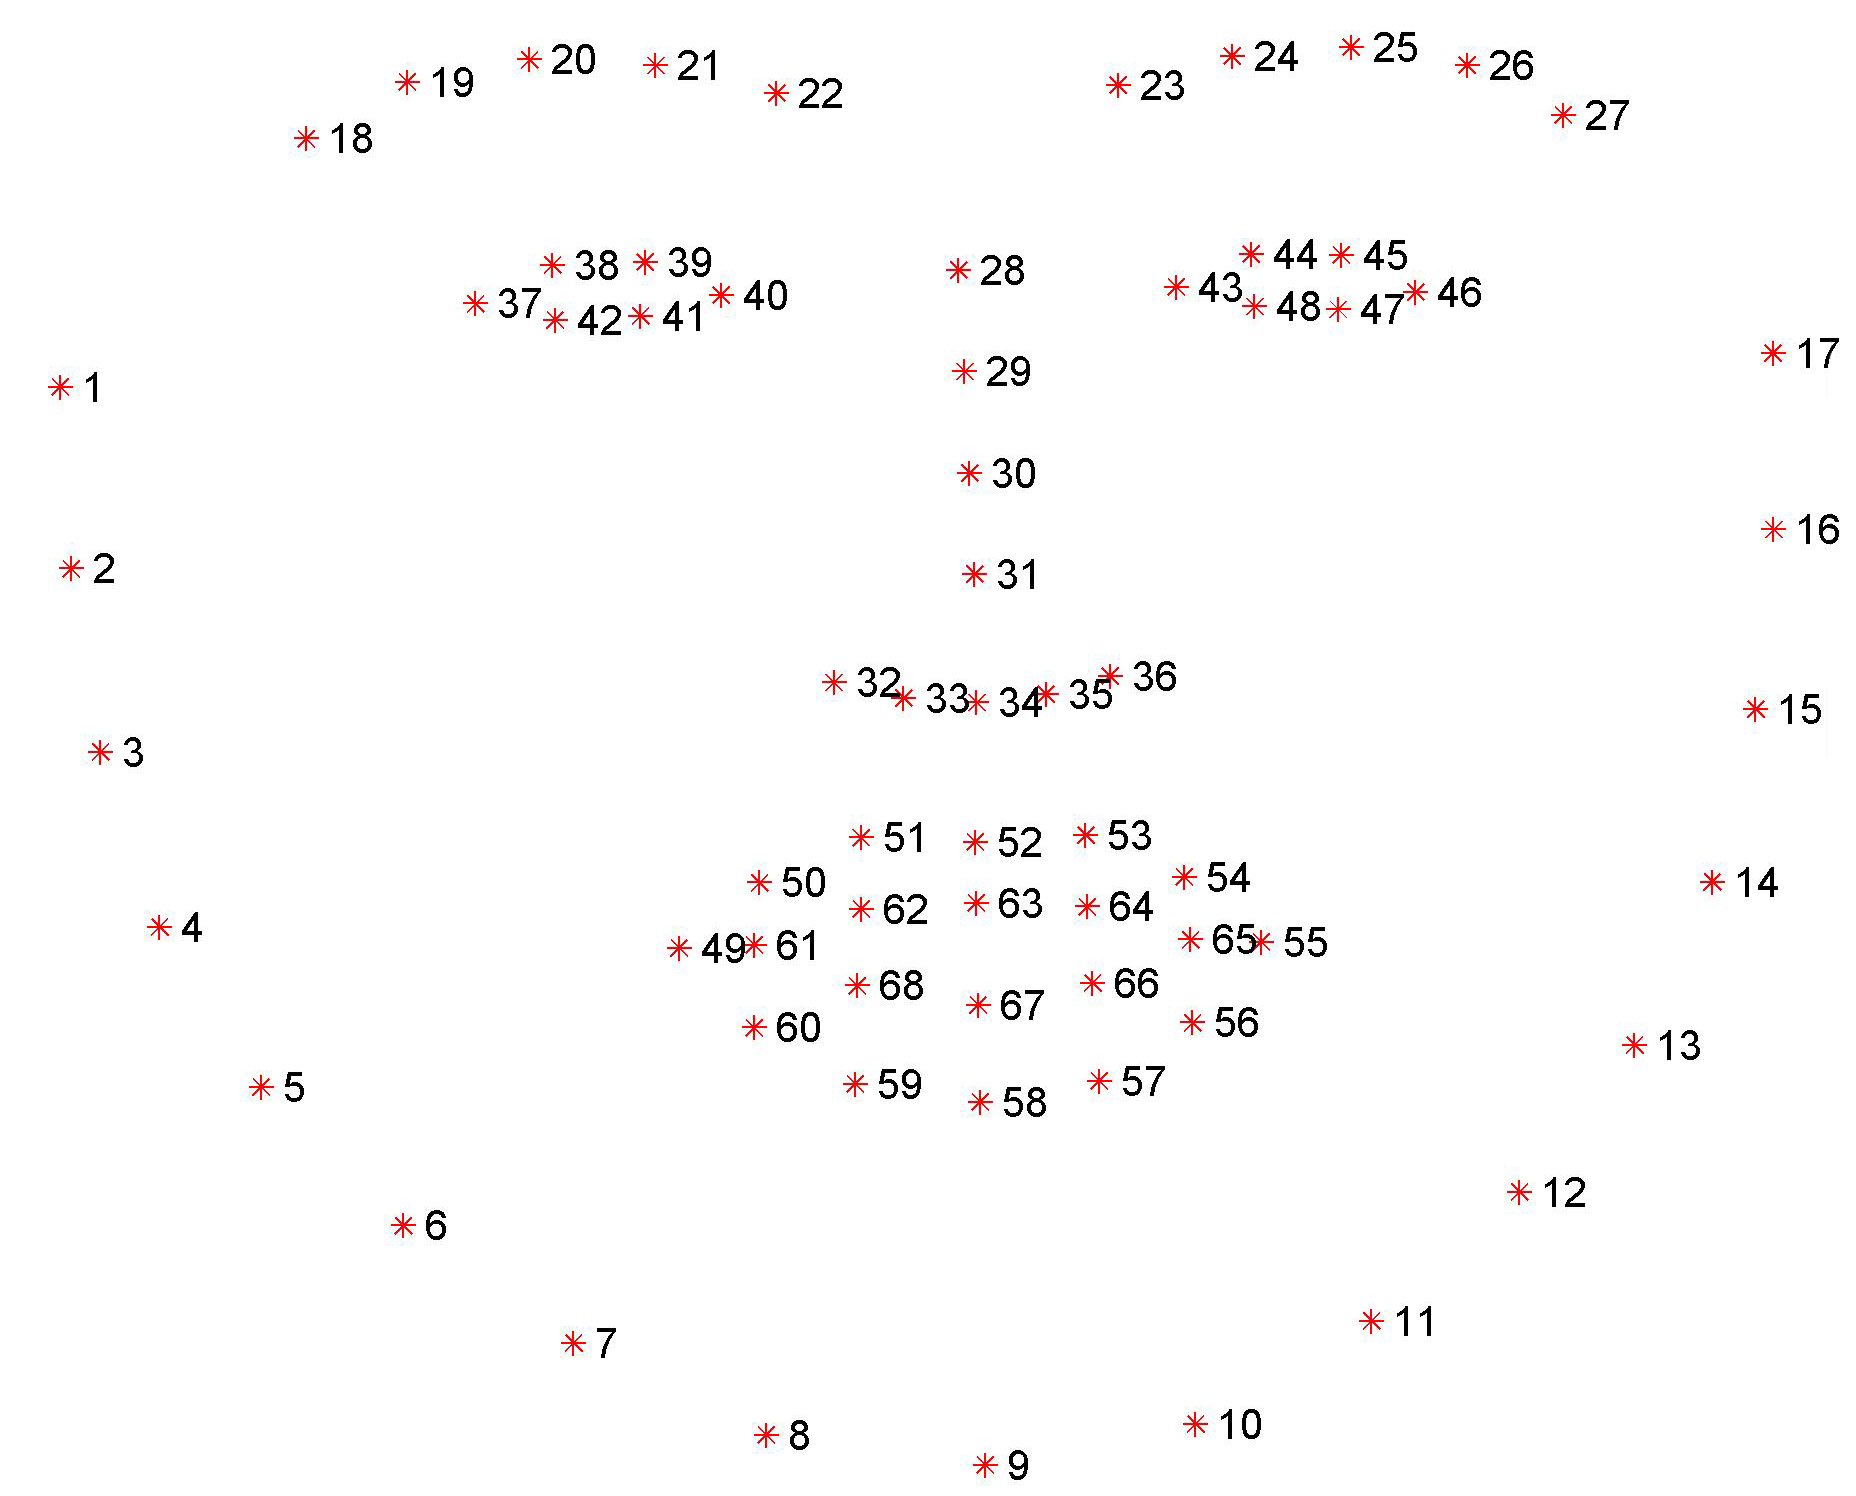
Part2. 添加人脸贴纸 这部分主要使用的是 PaddleHub 的人脸关键点检测模型,该模型能够检测到人脸的 68 个关键点,包括人脸轮廓、左右眉毛、左右眼睛、鼻子和嘴巴。具体点的位置如下图
添加贴纸的总体思想都是一样的,这里只对其中一个进行详细说明
耳朵贴纸实现过程 首先猫耳的图像如下:
读取人脸图像
调用 PaddleHub 人脸关键点检测模型(keypoint_detection)检测 68 个人脸关键点
调用PaddleHub人脸检测模型(face_detection)检测人脸框
读取贴纸图像(4 通道 png 图像)
计算左眉毛最左边的点和右眉毛最右边的点,通过两点计算角度,作为倾斜角度
将贴纸图像旋转上一步获取的角度,同时得到旋转矩阵
在贴纸上取一个点作为参考点(这里取得是贴纸中鼻子的点),用旋转矩阵计算出参考点在旋转贴纸中点对应的位置
通过人脸框的宽度将贴纸图像进行尺寸修改,同时计算修改尺寸后参考点的位置
将参考点与人脸的鼻子中的一个点对应进行融合得到最终结果
代码详解 首先导入依赖库,定义两个全局变量,LABELS 用于表示人脸的每个部分,COLORS 为了画关键点用于区分,get_random_color 方法用于获取随机颜色
import paddlehub as hubfrom random import randrangeimport mathimport numpy as npimport cv2def get_random_color (): return randrange(0 , 255 , 1 ), randrange(10 , 255 , 1 ), randrange(10 , 255 , 1 ) LABELS = ['chin' , 'left_eyebrow' , 'right_eyebrow' , 'nose_bridge' , 'nose_tip' , 'left_eye' , 'right_eye' , 'top_lip' , 'bottom_lip' ] COLORS = [get_random_color() for _ in LABELS]
然后调用 PaddleHub 关键点检测接口获取人脸关键点
def get_landmarks (img ): module = hub.Module(name="face_landmark_localization" ) result = module.keypoint_detection(images=[img]) landmarks = result[0 ]['data' ][0 ] return landmarks
由于在贴贴纸时需要根据脸的大小,然后对贴纸的大小进行调节,因此还需要定义获取人脸框的方法,该方法使用了 PaddleHub 中的人脸检测模型。模型返回的是左上角点坐标和右下角点坐标的形式,为了更好地处理人脸框,将其转换为左上角点,宽高的形式。
def get_face_rectangle (img ): face_detector = hub.Module(name="ultra_light_fast_generic_face_detector_1mb_320" ) result = face_detector.face_detection(images=[img]) x1 = int (result[0 ]['data' ][0 ]['left' ]) y1 = int (result[0 ]['data' ][0 ]['top' ]) x2 = int (result[0 ]['data' ][0 ]['right' ]) y2 = int (result[0 ]['data' ][0 ]['bottom' ]) return x1, y1, x2 - x1, y2 - y1
为了方便对人脸的每一部分进行处理,这里定义了一个对人脸关键点进行分区的方法,该方法返回人脸每个部分的一个字典。字典的 key 为人脸关键点的每个部分的名称,值为对应的关键点列表。
def face_landmarks (face_image, location_of_face=None ): landmarks = get_landmarks(face_image) landmarks_as_tuples = [[(int (p[0 ]), int (p[1 ])) for p in landmarks]] return [{ "chin" : points[0 :17 ], "left_eyebrow" : points[17 :22 ], "right_eyebrow" : points[22 :27 ], "nose_bridge" : points[27 :31 ], "nose_tip" : points[31 :36 ], "left_eye" : points[36 :42 ], "right_eye" : points[42 :48 ], "top_lip" : points[48 :55 ] + [points[64 ]] + [points[63 ]] + [points[62 ]] + [points[61 ]] + [points[60 ]], "bottom_lip" : points[54 :60 ] + [points[48 ]] + [points[60 ]] + [points[67 ]] + [points[66 ]] + [points[65 ]] + [points[64 ]] } for points in landmarks_as_tuples]
通常情况下,原始图像提供的贴纸都是正视的,但是人脸是有可能倾斜的,因此在贴贴纸时需要将贴纸进行相应角度的倾斜。以下两个方法分别定义了计算倾斜角度的方法和旋转贴纸的方法。
def calculate_angle (point1, point2 ): x1, x2, y1, y2 = point1[0 ], point2[0 ], point1[1 ], point2[1 ] return 180 / math.pi * math.atan((float (y2 - y1)) / (x2 - x1)) def rotate_bound (image, angle ): (h, w) = image.shape[:2 ] (cX, cY) = (w / 2 , h / 2 ) M = cv2.getRotationMatrix2D((cX, cY), -angle, 1.0 ) cos = np.abs (M[0 , 0 ]) sin = np.abs (M[0 , 1 ]) nW = int ((h * sin) + (w * cos)) nH = int ((h * cos) + (w * sin)) M[0 , 2 ] += (nW / 2 ) - cX M[1 , 2 ] += (nH / 2 ) - cY return cv2.warpAffine(image, M, (nW, nH)), M
最后定义两个方法来实现贴贴纸,add_sticker 需要输入原始图像文件路径,贴纸图像的文件路径,贴纸的参考点,贴纸基于人脸大小的比例,需要与贴纸参考点对应的人脸关键点部分。
def add_sticker (img, sticker_name, base_center, ratio, face_part, point_order, extra=[0 , 0 ] ): sticker = cv2.imread(sticker_name, -1 ) y_top_left, x_top_left, rotated = get_top_left(img, sticker, base_center, ratio, face_part, point_order, extra) sticker_h, sticker_w, _ = rotated.shape start = 0 if y_top_left < 0 : sticker_h = sticker_h + y_top_left start = -y_top_left y_top_left = 0 for chanel in range (3 ): img[y_top_left:y_top_left + sticker_h, x_top_left:x_top_left + sticker_w, chanel] = \ rotated[start:, :, chanel] * (rotated[start:, :, 3 ] / 255.0 ) + \ img[y_top_left:y_top_left + sticker_h, x_top_left:x_top_left + sticker_w, chanel] \ * (1.0 - rotated[start:, :, 3 ] / 255.0 ) return img def get_top_left (img, sticker, base_center, ratio, face_part, point_order, extra=[0 , 0 ] ): landmarks = face_landmarks(img) angle = calculate_angle(landmarks[0 ]['left_eyebrow' ][0 ], landmarks[0 ]['right_eyebrow' ][-1 ]) nose_tip_center = base_center rotated, M = rotate_bound(sticker, angle) tip_center_rotate = np.dot(M, np.array([[nose_tip_center[0 ]], [nose_tip_center[1 ]], [1 ]])) sticker_h, sticker_w, _ = rotated.shape x, y, w, h = get_face_rectangle(img) dv = w / sticker_w * ratio distance_x, distance_y = int (tip_center_rotate[0 ] * dv), int (tip_center_rotate[1 ] * dv) rotated = cv2.resize(rotated, (0 , 0 ), fx=dv, fy=dv) if len (point_order) == 2 : y_top_left = (landmarks[0 ][face_part[0 ]][point_order[0 ]][1 ] + landmarks[0 ][face_part[1 ]][point_order[1 ]][1 ]) // 2 - distance_y - extra[1 ] x_top_left = (landmarks[0 ][face_part[0 ]][point_order[0 ]][0 ] + landmarks[0 ][face_part[1 ]][point_order[1 ]][0 ]) // 2 - distance_x - extra[0 ] else : y_top_left = landmarks[0 ][face_part[0 ]][point_order[0 ]][1 ] - distance_y x_top_left = landmarks[0 ][face_part[0 ]][point_order[0 ]][0 ] - distance_x return y_top_left, x_top_left, rotated
基于上面两个方法可以实现任意贴纸的效果,只要指定了合适的参考点和对应点即可。
Part4. 更换视频背景 由于 PaddleHub 目前仅支持图像的分割,因此要进行视频背景替换需要先将视频转换为图像帧,然后对图像进行背景替换,最后再合成视频。
如果视频过长,可以使用以下代码对视频进行裁剪,或者将视频中不包含人像的时间段裁剪掉,方便提取人像。
!ffmpeg -i video/01.mp4 -ss 00:00:10 -c copy -t 00:00:20 video/01_cut.mp4 -loglevel quiet
video/01.mp4 为需要处理的视频,-ss 表示需要处理的起始时间点,-t 表示持续时间,即总共需要处理的时间。上面代码的意思就是处理视频 video/01.mp4,从 00:00:10 开始,总共处理 20 秒,处理方式是 copy,也就相当于将原视频从 00:00:10 开始裁剪到 00:00:30。
然后分别将前景视频和背景视频转换为图像
!mkdir video/01 !ffmpeg -i video/01_cut.mp4 -r 25.0 video/01/out%4d.png -loglevel quiet
!mkdir video/02
!ffmpeg -i video/02.mp4 -r 25.0 video/02/out%4d.png -loglevel quiet
之后创建一个文件夹用于存储结果图像集
最后用 python 代码进行图像背景替换(图像融合)
注意:这里的代码仅支持图像分割模型 1.0.0 版本,需要使用以下代码进行安装对应的版本
$ hub install deeplabv3p_xception65_humanseg==1.0.0
另外这里我将 seg 的源码进行了修改,具体参考 AIStudio 项目中的代码和介绍
import cv2import paddlehub as hubimport numpy as npfrom PIL import Imagehub.logger.setLevel('ERROR' ) module = hub.Module(name="deeplabv3p_xception65_humanseg" ) def blend_images (fore_image, base_image, ratio, pos=None ): """ 将抠出的人物图像换背景 fore_image: 前景图片,抠出的人物图片 base_image: 背景图片 ratio: 调整前景的比例 pos: 前景放在背景的位置的,格式为左上角坐标 """ if isinstance (base_image, str ): bg_img = cv2.imread(base_image) else : bg_img = base_image if isinstance (fore_image, str ): fg_img = cv2.imread(fore_image, -1 ) else : fg_img = fore_image height_fg, width_fg, _ = fg_img.shape height_bg, width_bg, _ = bg_img.shape if ratio > (height_bg / height_fg): print (f'ratio is too large, use maximum ratio {(height_bg / height_fg): .2 } ' ) ratio = round ((height_bg / height_fg), 1 ) if ratio < 0.1 : print ('ratio < 0.1, use minimum ratio 0.1' ) ratio = 0.1 if not pos: pos = (height_bg - int (ratio * height_fg), width_bg // 4 ) roi = bg_img[pos[0 ]: pos[0 ] + int (height_fg * ratio), pos[1 ] : pos[1 ]+int (width_fg*ratio)] roi = cv2.cvtColor(roi, cv2.COLOR_BGR2RGB) if isinstance (fore_image, str ): fore_image = Image.open (fore_image).resize(roi.shape[1 ::-1 ]) else : fore_image = cv2.resize(fore_image, roi.shape[1 ::-1 ]) scope_map = np.array(fore_image)[:, :, -1 ] / 255 scope_map = scope_map[:, :, np.newaxis] scope_map = np.repeat(scope_map, repeats=3 , axis=2 ) res_image = np.multiply(scope_map, np.array(fore_image)[:, :, 2 ::-1 ]) + np.multiply((1 - scope_map), np.array(roi)) bg_img[pos[0 ]: pos[0 ] + roi.shape[0 ], pos[1 ]: pos[1 ] + roi.shape[1 ]] = np.uint8(res_image)[:, :, ::-1 ] return bg_img def seg (image, back_img_name ): input_dict = {"image" : [image]} result, seg_img = module.segmentation(data=input_dict) seg_img = seg_img.astype(np.uint8) img = blend_images(seg_img, back_img_name, 1 , (0 , 0 )) return img
import osfore_path = 'video/01/' back_path = 'video/02/' fore_lists = sorted ([fore_path + name for name in os.listdir(fore_path)]) back_lists = sorted ([back_path + name for name in os.listdir(back_path)]) for i in range (len (back_lists)): img = seg(fore_lists[i], back_lists[i]) cv2.imwrite('video/result1/' + f'{i} ' .zfill(4 ) + '.png' , img)
因为是每一帧每一帧进行处理的,所以这个过程非常非常漫长。。。
如果直接合成的视频是没有音频的,因此为了效果,先提取原始视频中的音频,然后再将音频与该生成视频进行融合。
!ffmpeg -i video/01_cut.mp4 video/3.mp3 -loglevel quiet !ffmpeg -f image2 -i video/result/%4d.png -r 25 video/result.mp4 -loglevel quiet !ffmpeg -i video/result.mp4 -i video/3.mp3 -vcodec copy -acodec copy video/final.mp4 -loglevel quiet
最后为了在 AIStudio 中展示视频,我将视频传到了 github 作为 CDN,然后通过 IPython 的 Video 进行展示。
from IPython.display import HTML, VideoVideo("https://cdn.jsdelivr.net/gh/busyboxs/CDN@latest/video/01_cut.mp4" , width=960 , height=600 )
相关项目与其他内容


