原文地址: https://hackernoon.com/tensorflow-vs-keras-comparison-by-building-a-model-for-image-classification-f007f336c519
是的,标题中的问题在数据科学家之间的谈话中是很常见(甚至你!)。有人说TensorFlow更好,有人说Keras更好!让我们看看这个问题在图像分类的实际应用中的答案。
在此之前,先介绍Keras和Tensorflow这两个术语,帮助你在10分钟内构建强大的图像分类器!
Tensorflow: Tensorflow是开发深度学习模型最常用的库。它是有史以来最好的库,在日常实验中被许多极客选择。如果我说Google已经将Tensor Processing Units(TPU)用于处理张量,你能想象吗?是的,他们已经这样做了。他们提出了一个名为TPU的独立实例,它具有最强大的功率驱动计算能力来处理tensorflow的深度学习模型。
Time to BUILD IT!(是时候建立它了!) 我现在将帮助你使用tensorflow创建一个功能强大的图像分类器。等等!什么是分类器?这只是一个简单的问题,你向你的tensorflow代码询问,给定的图像是玫瑰还是郁金香。所以,首先的首先,让我们在机器上安装tensorflow。官方文档有两个版本,即CPU和GPU版本。对于CPU版本:
请注意,我是在GPU上而非CPU上进行实验后才写的这篇博客。这里 给出了详细的GPU安装。
现在,让我们采用Google的Tensorflow进行实验来训练模型。谷歌的这个仓库有许多令人惊叹的处理图像的简单实验的脚本。它非常简洁,足以满足我们的目的。还记得前面我用过“强大”这个词吗?是的,当我们使用称为迁移学习的方法时,这个词就会生效。迁移学习是一种有效的方式,它使用预训练模型,这些模型已经训练了几天或几周,然后改变最后一层以适应我们自己的类别。
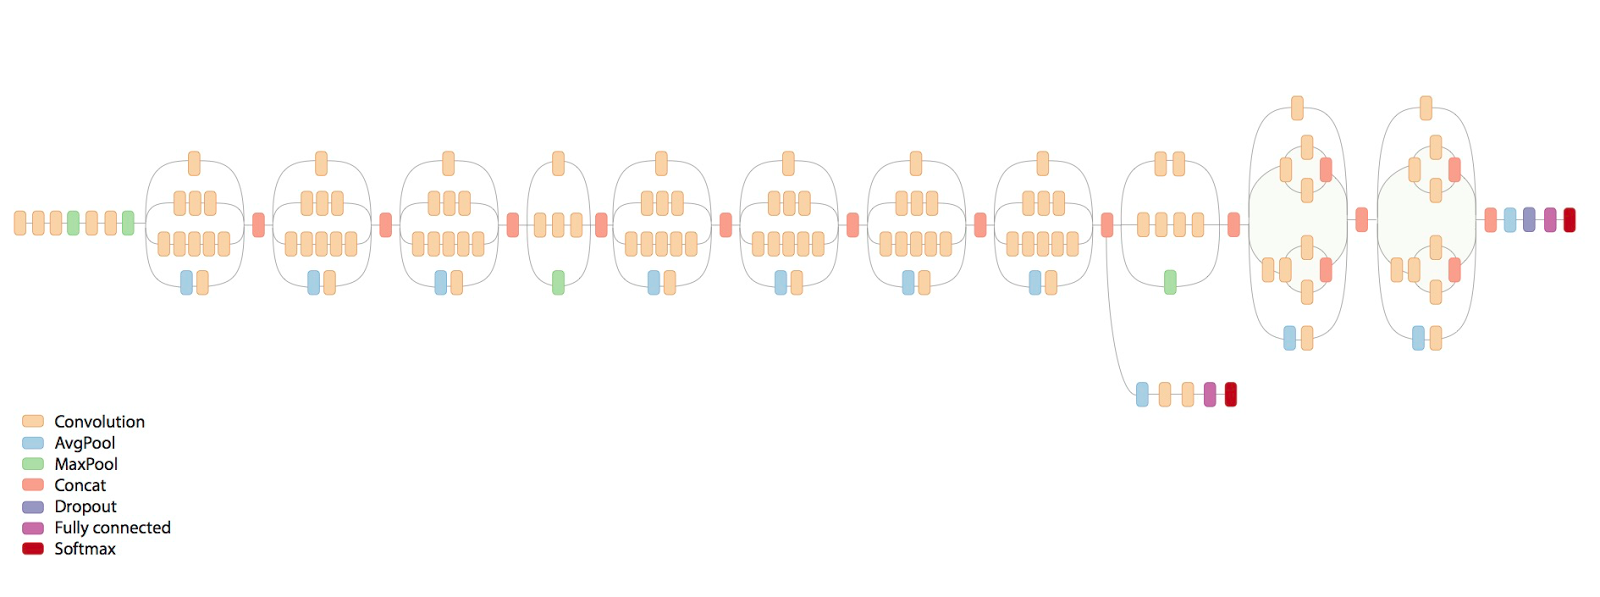
Inception V3是一个非常好的模型,在2015 ImageNet Challenge 图像分类竞赛中排名第二。当数据集的每个类别具有较少图像数量时,它被提及为迁移学习的最佳网络。
现在克隆git仓库:
git clone https://github.com/googlecodelabs/tensorflow-for-poets-2
cd tensorflow-for-poets-2
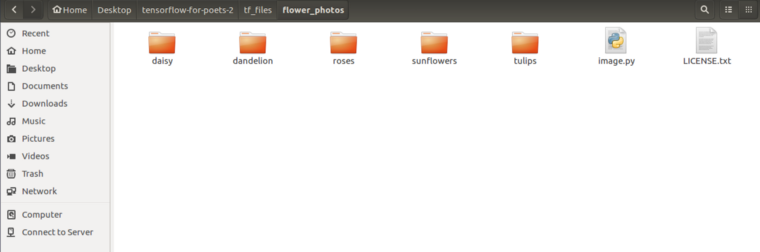
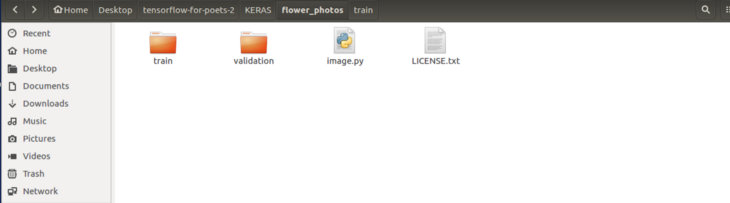
现在,你可以选择图像。你所要做的就是以下面的方式存储数据集文件夹。
— Dataset folder -
       class1/
           — image1
           — image2
       class2/
           — image1
           — image2
它看起来应该像上面图那样(忽略image.py)。通过下面代码获得flower_photos文件夹:
curl http://download.tensorflow.org/example_images/flower_photos.tgz | tar xz -C tf_files
Creating the Dataset 你可以使用任何你喜欢的图像。越多越好(目标是几千)。向上面文件夹格式那样以类别将它们分开,并确保它们在一个名为tf_files的文件夹中。
你可以下载已经存在的有多种任务使用的数据集,如癌症检测,权力的游戏中的人物分类。这里 有各种图像分类数据集。
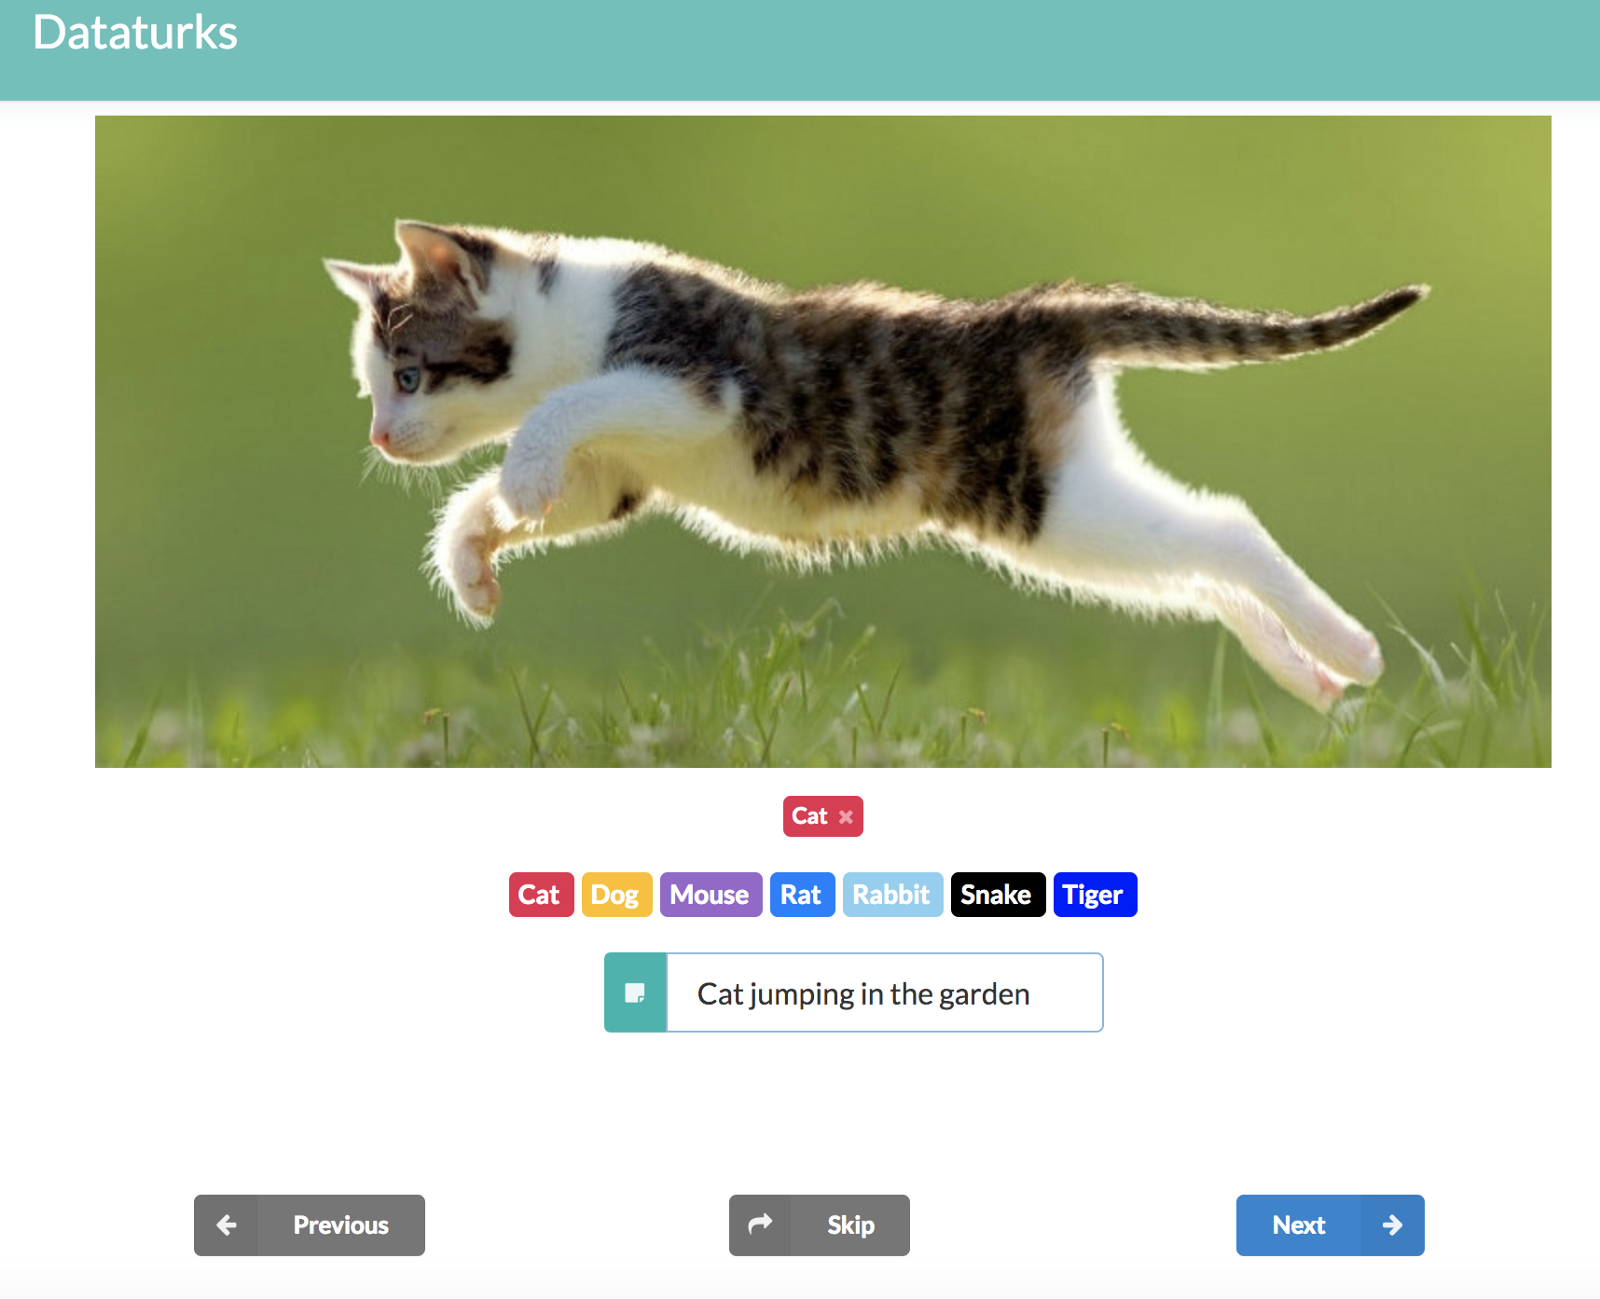
或者,如果你有自己独特的用例,则可以为其创建自己的数据集。你可以从网上下载图像并立即制作大型数据集,使用像Dataturks 这样的注释工具,你可以手动上传图像并标记图像。更好的是,Dataturks的输出可以很容易地用于构建tf_files。
我发现了一个很棒的插件,可以在Google Chrome上批量下载图像。这个和Dataturks将使构建训练数据变得轻而易举。链接在这里 。
您可以尝试使用dataturks的image_classification工具 执行此操作。这里该工具提供的最佳功能是,如果我们有一个非结构化数据集,其中所有图像都在一个文件夹中。通过手动标记图像的类别,你可以下载一个json文件,该文件包含嵌入其中的类的图像的所有详细信息。然后使用下面给出的keras 和tensorflow 脚本:
-------> for tensorflow
python3 tensorflow_json_parser.py — json_file “flower.json” — dataset_path “Dataset5/”

-------> for keras
python3 keras_json_parser.py --json_file "flower.json" --dataset_path "Dataset5/" --train_percentage 80 --validation_percentage 20
Training 现在是时候训练模型了。在tensorflow-for-poets-2文件夹中,有一个名为scripts的文件夹,它包含重新训练模型所需的一切。retrain.py有一种特殊的裁剪和缩放图像的方式,非常酷。
然后使用以下命令训练,选项名称本身描述所需的训练路径的位置。
python3 -m scripts.retrain \
 --bottleneck_dir=tf_files/bottlenecks \
 --model_dir=tf_files/models/inception \
 --output_graph=tf_files/retrained_graph.pb \
 --output_labels=tf_files/retrained_labels.txt \
 --image_dir=tf_files/flower_photos
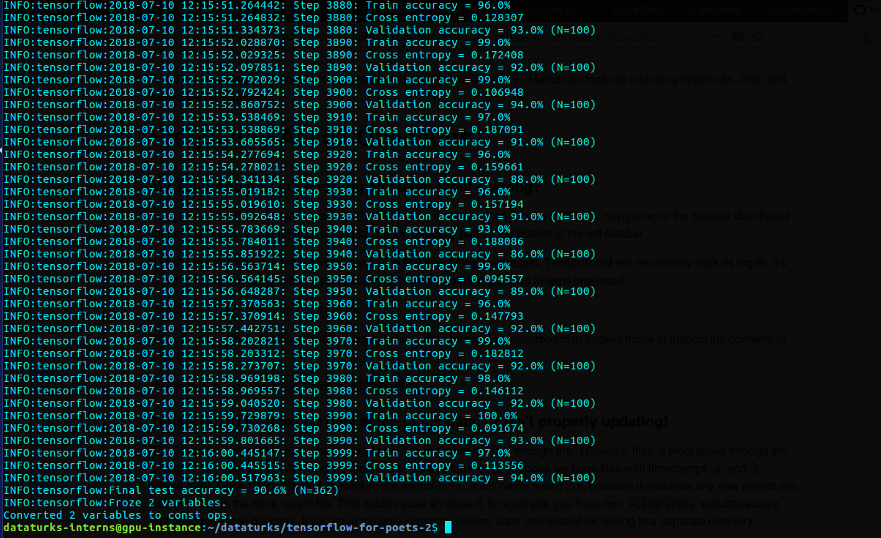
这将下载inception模型并使用training文件夹和给定的参数训练最后一层。我使用12GB Nvidia Tesla k80和7GB Vram在GCP实例上训练了4000步。
训练时80%数据集用作训练,20%用作测试,我们可以看到,它给出了91%的test_accuracy。现在是时候测试了!我们在tf_files/中有一个.pb文件,可用于测试。label_image.py中添加了以下更改
from PIL import Image,ImageDraw,ImageFontresults = results.tolist() image = Image.open (file_name) fonttype = ImageFont.truetype(“/usr/share/fonts/truetype/dejav/DejaVuSans.ttf”,18 ) draw = ImageDraw.Draw(image) draw.text(xy=(5 ,5 ),text=str (labels[results.index(max (results))])+”:”+str (max (results)),fill = (255 ,255 ,255 ,128 ),font = fonttype) image.show() image.save(file_name.split(“.”)[0 ]+”1 "+”.jpg”)
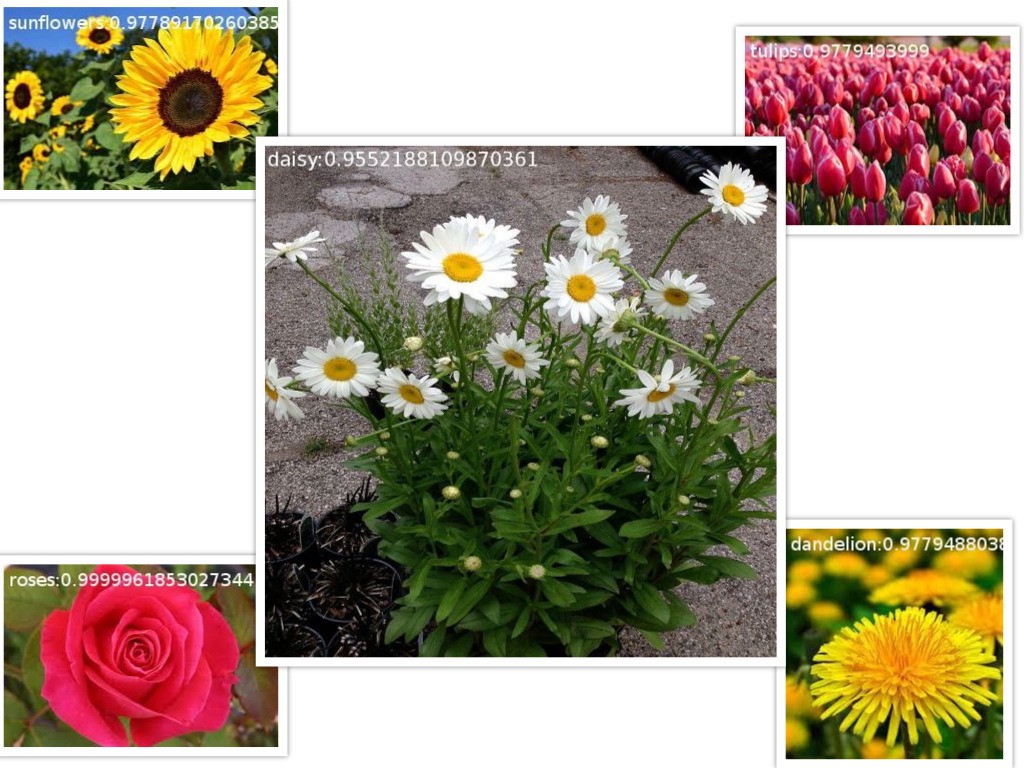
上面的代码将帮助我们绘制正在测试的图像的准确性并保存它。对于rodom图像的置信度百分比如下所示
下面显示了几个测试图像的输出
正如我们所看到的,结果对于所述任务来说真的很好了。
KERAS: Keras是一个基于TensorFlow构建的高级API(也可以在Theano之上使用)。与Tensorflow相比,它更加用户友好且易于使用。如果我们是所有这些深度学习的新手,并想从头开始编写一个新模型,那么我会建议使用Keras,因为其易读性和易写性。可以通过下面指令安装:
甚至这个东西都包含了tensorflow,所以CPU v/s GPU兼容性变化也将适用于此。
因为,我们必须执行使用inception模型的迁移学习对花进行分类的相同任务,我已经看到Keras以标准格式加载模型,如API编写的那样。
from keras.applications.inception_v3 import preprocess_input
Keras有一种加载数据集的标准格式,即我们不是直接在数据集文件夹中提供文件夹,而是手动划分训练和测试数据,并按以下方式排列。我使用了我在tensorflow部分下载的相同数据集,并按照以下说明进行了一些更改。
— Dataset folder -
  — train/
       class1/
          — image1
          — image2
       class2/
          — image1
          — image2
  — test/
      class1/
          — image1
          — image2
      class2/
          — image1
          — image2
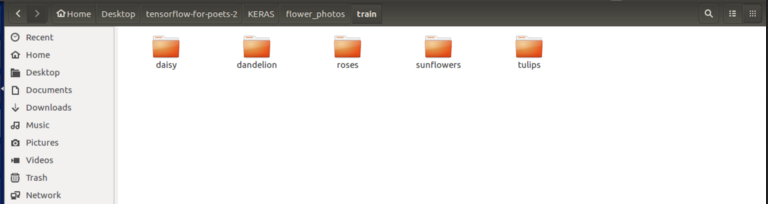
它看起来应该如下所示:
上面的训练和测试文件夹应该有如下所示的文件夹:
至于,我们现在已完成数据集的设置,是时候进行训练了。我已经写了一小段代码来进行下面的训练:
import osimport sysimport globimport argparseimport matplotlib.pyplot as pltfrom keras import __version__from keras.applications.inception_v3 import InceptionV3, preprocess_inputfrom keras.models import Modelfrom keras.layers import Dense, GlobalAveragePooling2Dfrom keras.preprocessing.image import ImageDataGeneratorfrom keras.optimizers import SGDIM_WIDTH, IM_HEIGHT = 299 , 299 NB_EPOCHS = 3 BAT_SIZE = 32 FC_SIZE = 1024 NB_IV3_LAYERS_TO_FREEZE = 172 def get_nb_files (directory ): """Get number of files by searching directory recursively""" if not os.path.exists(directory): return 0 cnt = 0 for r, dirs, files in os.walk(directory): for dr in dirs: cnt += len (glob.glob(os.path.join(r, dr + "/*" ))) return cnt def setup_to_transfer_learn (model, base_model ): """Freeze all layers and compile the model""" for layer in base_model.layers: layer.trainable = False model.compile (optimizer='rmsprop' , loss='categorical_crossentropy' , metrics=['accuracy' ]) def add_new_last_layer (base_model, nb_classes ): """Add last layer to the convnet Args: base_model: keras model excluding top nb_classes: # of classes Returns: new keras model with last layer """ x = base_model.output x = GlobalAveragePooling2D()(x) x = Dense(FC_SIZE, activation='relu' )(x) predictions = Dense(nb_classes, activation='softmax' )(x) model = Model(input =base_model.input , output=predictions) return model def setup_to_finetune (model ): """Freeze the bottom NB_IV3_LAYERS and retrain the remaining top layers. note: NB_IV3_LAYERS corresponds to the top 2 inception blocks in the inceptionv3 arch Args: model: keras model """ for layer in model.layers[:NB_IV3_LAYERS_TO_FREEZE]: layer.trainable = False for layer in model.layers[NB_IV3_LAYERS_TO_FREEZE:]: layer.trainable = True model.compile (optimizer=SGD(lr=0.0001 , momentum=0.9 ), loss='categorical_crossentropy' , metrics=['accuracy' ]) def train (args ): """Use transfer learning and fine-tuning to train a network on a new dataset""" nb_train_samples = get_nb_files(args.train_dir) nb_classes = len (glob.glob(args.train_dir + "/*" )) nb_val_samples = get_nb_files(args.val_dir) nb_epoch = int (args.nb_epoch) batch_size = int (args.batch_size) train_datagen = ImageDataGenerator( preprocessing_function=preprocess_input, rotation_range=30 , width_shift_range=0.2 , height_shift_range=0.2 , shear_range=0.2 , zoom_range=0.2 , horizontal_flip=True ) test_datagen = ImageDataGenerator( preprocessing_function=preprocess_input, rotation_range=30 , width_shift_range=0.2 , height_shift_range=0.2 , shear_range=0.2 , zoom_range=0.2 , horizontal_flip=True ) train_generator = train_datagen.flow_from_directory( args.train_dir, target_size=(IM_WIDTH, IM_HEIGHT), batch_size=batch_size, ) validation_generator = test_datagen.flow_from_directory( args.val_dir, target_size=(IM_WIDTH, IM_HEIGHT), batch_size=batch_size, ) base_model = InceptionV3(weights='imagenet' , include_top=False ) model = add_new_last_layer(base_model, nb_classes) setup_to_transfer_learn(model, base_model) history_tl = model.fit_generator( train_generator, nb_epoch=nb_epoch, samples_per_epoch=nb_train_samples, validation_data=validation_generator, nb_val_samples=nb_val_samples, class_weight='auto' ) setup_to_finetune(model) history_ft = model.fit_generator( train_generator, samples_per_epoch=nb_train_samples, nb_epoch=nb_epoch, validation_data=validation_generator, nb_val_samples=nb_val_samples, class_weight='auto' ) model.save(args.output_model_file) if args.plot: plot_training(history_ft) def plot_training (history ): acc = history.history['acc' ] val_acc = history.history['val_acc' ] loss = history.history['loss' ] val_loss = history.history['val_loss' ] epochs = range (len (acc)) plt.plot(epochs, acc, 'r.' ) plt.plot(epochs, val_acc, 'r' ) plt.title('Training and validation accuracy' ) plt.figure() plt.plot(epochs, loss, 'r.' ) plt.plot(epochs, val_loss, 'r-' ) plt.title('Training and validation loss' ) plt.show() if __name__=="__main__" : a = argparse.ArgumentParser() a.add_argument(" - train_dir" ) a.add_argument(" - val_dir" ) a.add_argument(" - nb_epoch" , default=NB_EPOCHS) a.add_argument(" - batch_size" , default=BAT_SIZE) a.add_argument(" - output_model_file" , default="inceptionv3-ft.model" ) a.add_argument(" - plot" , action="store_true" ) args = a.parse_args() if args.train_dir is None or args.val_dir is None : a.print_help() sys.exit(1 ) if (not os.path.exists(args.train_dir)) or (not os.path.exists(args.val_dir)): print ("directories do not exist" ) sys.exit(1 ) train(args)
这段代码编写得很整齐,可以通过传递给下面命令的参数轻松理解:
python3 inception_train.py
 — train_dir flower_photos/train \
 — val_dir flower_photos/validation \
 — nb_epoch 50 \
 — batch_size 10 \
 — output_model_file inception_yo1.model
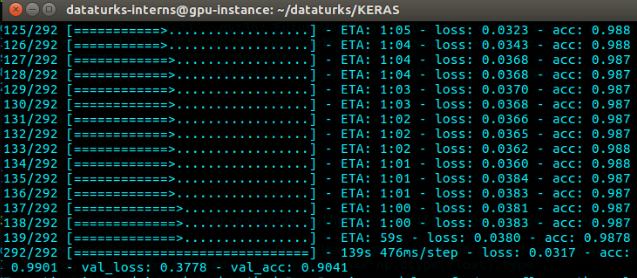
我的GPU上训练一分钟1 epoch,每个epoch 292步,并且训练了50个epoch(这是非常多!),批量大小为10,数据分割为80%训练集,20%测试集。
哇哦。我们完成了训练并得到了约91%的测试准确率,损失为0.38。该模型已保存为一个inception.model文件,可以再次加载并测试。为此,编写了另一个脚本,同时在图像上绘制预测类别并保存它。测试脚本如下:
import sysimport argparseimport numpy as npfrom PIL import Imageimport requestsfrom io import BytesIOimport matplotlib.pyplot as pltfrom PIL import Image,ImageDraw,ImageFontfrom keras.preprocessing import imagefrom keras.models import load_modelfrom keras.applications.inception_v3 import preprocess_inputtarget_size = (229 , 229 ) def predict (model, img, target_size ): """Run model prediction on image Args: model: keras model img: PIL format image target_size: (w,h) tuple Returns: list of predicted labels and their probabilities """ if img.size != target_size: img = img.resize(target_size) x = image.img_to_array(img) x = np.expand_dims(x, axis=0 ) x = preprocess_input(x) preds = model.predict(x) return preds[0 ] def plot_preds (image, preds ): """Displays image and the top-n predicted probabilities in a bar graph Args: image: PIL image preds: list of predicted labels and their probabilities """ plt.imshow(image) plt.axis('off' ) plt.figure() labels = ("daisy" , "dandelion" ,"roses" ,"sunflower" ,"tulips" ) plt.barh([0 , 1 ,2 ,3 ,4 ], preds, alpha=0.5 ) plt.yticks([0 , 1 ,2 ,3 ,4 ], labels) plt.xlabel('Probability' ) plt.xlim(0 ,1.01 ) plt.tight_layout() plt.show() if __name__=="__main__" : a = argparse.ArgumentParser() a.add_argument(" - image" , help ="path to image" ) a.add_argument(" - image_url" , help ="url to image" ) a.add_argument(" - model" ) args = a.parse_args() if args.image is None and args.image_url is None : a.print_help() sys.exit(1 ) model = load_model(args.model) model.fit() if args.image is not None : labels = ("daisy" , "dandelion" ,"roses" ,"sunflower" ,"tulips" ) image1 = Image.open (args.image) preds = predict(model, image1, target_size) print (preds) preds = preds.tolist() plot_preds(image1, preds) fonttype = ImageFont.truetype("/usr/share/fonts/truetype/dejavu/DejaVuSans.ttf" ,18 ) draw = ImageDraw.Draw(image1) draw.text(xy=(5 ,5 ),text = str (labels[preds.index(max (preds))])+":" +str (max (preds)),fill = (255 ,255 ,255 ,128 ),font = fonttype) image1.show() image1.save((args.image).split("." )[0 ]+"1" +".jpg" )
可以通过下面的命令进行测试
python3 -m scripts.label_image — graph=tf_files/retrained_graph.pb — image=rose.jpeg
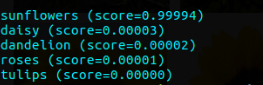
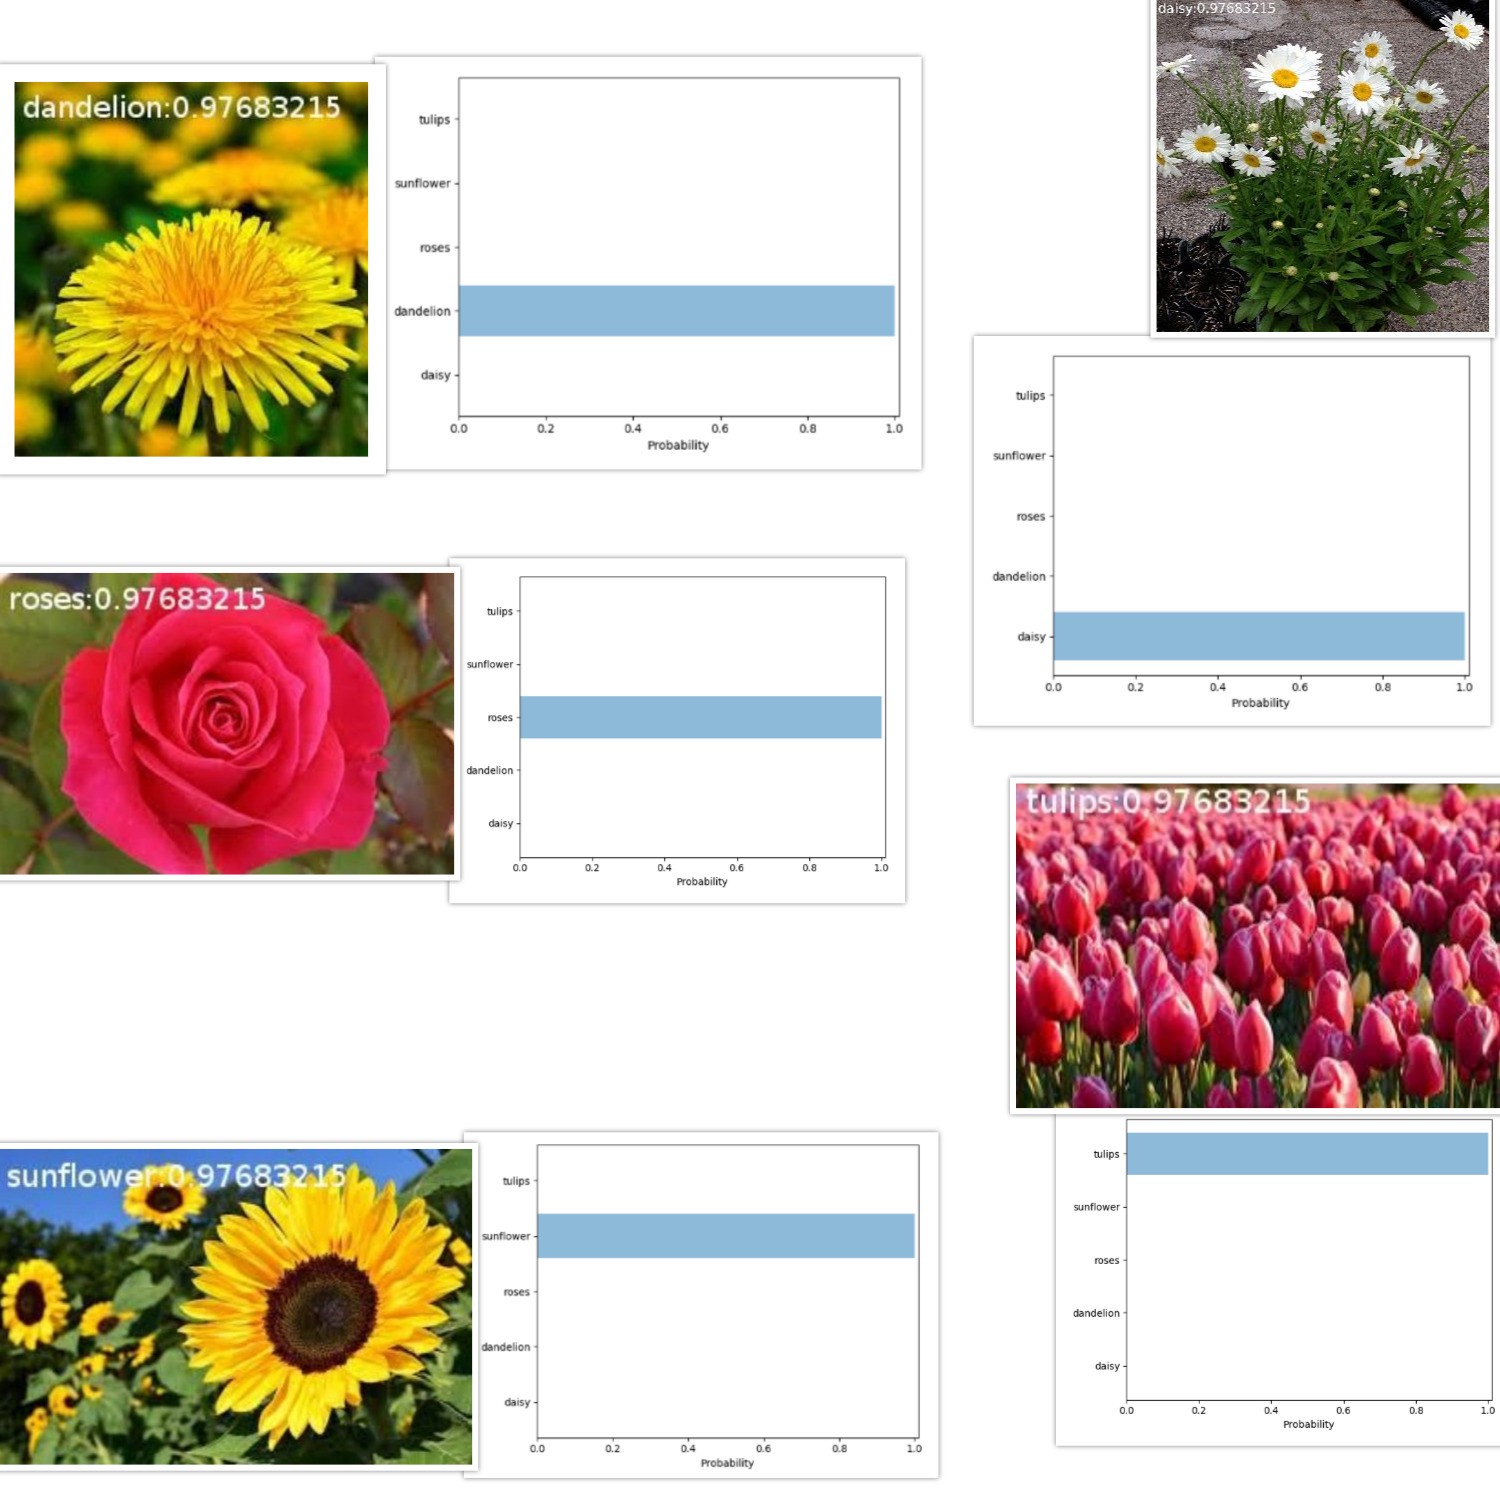
所有类别的预测置信度百分比输出如下
以下是带图表的少数输出
最后!您已经学会了如何使用Keras和tensorflow构建强大的分类器。但是,哪一个是最好的仍然是我们头脑中的问题!因此,让我们仅根据此分类任务进行比较研究。
keras的全部训练和测试代码以及tensorflow的更改的脚本都可以在我的github 中找到。
Prototyping: 如果你真的想快速编写代码并构建一个模型,那么Keras就是一个很好的选择。我们可以在几分钟内建立复杂模型!Model和Sequential API非常强大,因为它们易于使用,它们甚至不会让你感觉自己是构建强大的模型。
model = Sequential() model.add(Dense(32 , activation='relu' , input_dim=100 )) model.add(Dense(1 , activation='sigmoid' )) model.compile (optimizer='rmsprop' , loss='binary_crossentropy' , metrics=['accuracy' ]) import numpy as npdata = np.random.random((1000 , 100 )) labels = np.random.randint(2 , size=(1000 , 1 )) model.fit(data, labels, epochs=10 , batch_size=32 )
就是这样,一个模型就准备好了!甚至相对于tensorflow,迁移学习在Keras中更容易编码实现。在你是一个非常厉害的程序员之前,Tensorflow从头开始编码都太难。
从0开始以及灵活性 由于与Keras相比tensorflow是一个低级库,相比于在Keras中,许多新功能可以在tensorflow中以更好的方式实现,例如,任何的激活函数等等。而且由于可用的参数更多,模型的微调和调整在tensorflow中比在Keras中非常灵活。
训练时间和处理能力: 上述模型是在相同的数据集上训练的,我们看到相比于tensorflow,Keras需要更多的时间进行训练。Tensorflow在15分钟内完成了4000步的训练,而Keras在50个epoch内花了大约2个小时。可能是我们无法比较epoch与步长,但在这种情况下你看到了,相比之下两者的测试准确度均为91%,因此我们可以描述keras训练比tensorflow慢一点。除此之外,由于tensorflow是一个低级库,因此它是有道理的。
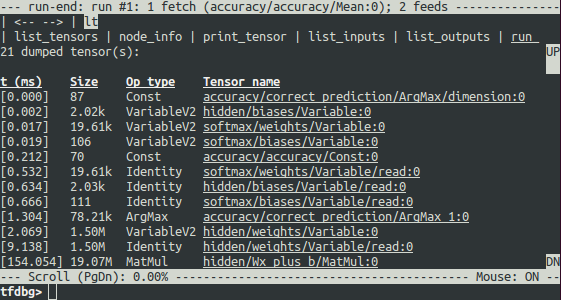
提供额外功能: Tensorflow有一个内置的调试器,可以在训练期间调试以及生成图形。
Tensorflow甚至支持线程和队列来异步训练大型张量!这为TPU提供了更好,更快的处理速度。线程的示例代码如下所示:
init_op = tf.global_variables_initializer() sess = tf.Session() sess.run(init_op) coord = tf.train.Coordinator() threads = tf.train.start_queue_runners(sess=sess, coord=coord) try : while not coord.should_stop(): sess.run(train_op) except tf.errors.OutOfRangeError: print ('Done training -- epoch limit reached' ) finally : coord.request_stop() coord.join(threads) sess.close()
监测和控制: 根据我在深度学习方面的经验,我认为tensorflow非常适合许多情况,尽管它有点难度。例如,我们可以非常轻松地监控每个和所有内容,例如控制网络的权重和梯度。我们可以选择应该训练哪个步骤,哪个不应该。这在Keras中是不可行的。下面给出就是魔术!
step = tf.Variable(1 , trainable=False , dtype=tf.int32)
结论: 无论如何,Keras很快将被整合到tensorflow中!那么,为什么要去pythonic?(Keras是pythonic)。我的建议是花一些时间习惯tensorflow。上面的分类问题,如果您已经关注博客并相应地完成了相应的步骤,然后你会觉得相比于tensorflow,Keras在很多方面都little painful and patience killer。所以,尝试使用其他类,并尝试为应用程序训练分类器,如假笔记检测…
希望这篇博客能让你更好地了解何时使用它们!